

Share This:
TL;DR
- Backstage is an open-source Internal Developer Portal (IDP) framework, born at Spotify and now part of CNCF.
- It unifies catalog, templates, documentation, and infrastructure tooling behind a single UI, offering teams a consistent, governed, and self-service developer experience.
- Infra-automation plugins for Backstage emerge because organizations need to reduce support tickets, enforce compliance, standardize IaC, and span the lifecycle from generating code to runtime management.
- The infrastructure market has evolved toward integrated platforms that not only offer scans or pipelines, but can generate infrastructure, govern it, and operate it, often using AI agents, with StackGen embodying this next wave.
What is Backstage?
Think of Backstage as the backstage of a concert, but instead of musicians and sound engineers, it hosts the myriad tools developers need on a daily basis. Spotify built it to simplify managing services, documentation, infrastructure, and operational tools. Imagine walking into a backstage area where everything, costumes, soundboards, and lighting, is laid out logically and accessible. Similarly, Backstage surfaces everything developers need: the software catalog, scaffolding templates via Scaffolder, documentation, and a universe of plugins, all unified within a single UX.
Unlike traditional toolchains scattered across repositories, dashboards, wikis, and ticketing systems, Backstage consolidates those into one portal. It functions like a control center for everything developers interact with: service metadata, API docs, workflows, monitoring links, and IaC templates, sort of like a one-stop radio station dial to tune into every part of your operation.
Backstage also leans on a strong open-source foundation. Donated to the Cloud Native Computing Foundation (CNCF) after Spotify open-sourced it, it benefits from a thriving ecosystem and shared governance. This ensures plugins and integrations remain healthy and extensible beyond Spotify’s internal use. It’s not just a consumer product; it’s a developer platform for developers, offering deep customization and extensibility for platform engineering teams.
Why Teams Look for Infra-Automation Plugins Around Backstage
Teams adopt Backstage not just to document services but to cut down the flood of support tickets. Self-service templates allow developers to spin up infrastructure without waiting for approvals, like giving them a key to the tool shed instead of asking for permission each time.
This keeps developers in one portal while ensuring governance, as IaC templates enforce compliance and security. Standardized modules, Terraform, Helm, or others, act like recipe cards, ensuring consistent deployments across teams and clouds.
Modern needs go beyond generating templates. Teams expect orchestration, monitoring, drift detection, and remediation, all from within Backstage. With AI entering the picture, platforms like StackGen hint at what’s next. Gartner® projects 15% of infrastructure tasks will be semi-autonomously managed by AI by 2028, up from nearly zero in 2024 (PR Newswire), underscoring the move toward AI-driven infrastructure operations.
Key Capabilities to Look for in a Backstage Infra Plugin
1. IaC Generation vs. Orchestration
Infrastructure-as-Code (IaC) is the backbone of modern infrastructure management, but not every team approaches it the same way. Some teams want plugins that can generate Terraform configurations directly from Backstage service metadata, as StackGen does. This approach feels like having a chef prep the ingredients before the cook even steps into the kitchen, accelerating the start of the provisioning process.
Others focus more on orchestration, operating existing stacks, running deployments, or managing state in tools like Pulumi, Spacelift, or env0. This is closer to managing a production line where the recipe is already written; the priority becomes running, updating, and maintaining consistency across environments. A plugin’s value lies in whether it can bridge both worlds, generation for rapid service creation and orchestration for ongoing lifecycle operations.
2. Backstage Scaffolder Integration
Backstage’s Scaffolder is the secret ingredient that transforms static templates into developer-ready services. The best infra plugins don’t just run in isolation; they integrate tightly with Scaffolder actions to provision, update, or scale infrastructure directly from the portal. Think of it as turning a simple template generator into a launchpad that deploys resources in real time.
Pulumi, for instance, uses actions like pulumi:new to scaffold projects and pulumi:up to deploy infrastructure. Similarly, env0 provides ready-to-use templates that spin up resources while applying organizational policies. The difference is subtle but crucial; without native Scaffolder integration, Backstage becomes a catalog of shortcuts rather than a true self-service platform.
3. Multi-Cloud & Cloud-Native Support
Modern teams rarely work in a single environment. One project might run workloads on AWS while another needs Azure AD for identity and GCP for data analytics. A Backstage infra plugin that only covers one cloud quickly becomes a bottleneck. The strongest plugins support multi-cloud environments natively, ensuring Terraform, Pulumi, or Crossplane artifacts can be provisioned seamlessly across providers.
Cloud-native support is equally critical. It’s not enough to deploy VM instances; teams need plugins capable of handling Kubernetes manifests, Crossplane-backed claims, Helm charts, and Terraform state visualization. This mirrors the complexity of managing a city; roads, power grids, and water systems must all connect, regardless of the district they serve.
Top 5 Backstage Plugins for Infrastructure Automation (2025 Comparison)
1) StackGen Backstage Plugin – Turning Metadata into Infrastructure
Overview
If you’ve ever wished your Backstage portal could generate infrastructure automatically instead of merely cataloging it, StackGen delivers exactly that. It converts your Backstage service metadata into deployment-ready Terraform, not generic boilerplate but Terraform that’s aligned with your organization’s templates, policies, and naming conventions.
Think of StackGen as an AI-powered chef working in your developer kitchen. You tell it what dish you want (via Backstage catalog metadata), and it prepares a perfectly plated recipe, your infrastructure, while following your kitchen’s rules, ingredient sourcing, and plating style.
StackGen supports multi-cloud mapping across AWS, Azure, and GCP, enabling teams to seamlessly define resources at an abstract level in Backstage while letting StackGen choose the appropriate equivalent in your preferred cloud provider.
Key Features
1. Metadata-Driven IaC Generation
Traditional IaC workflows start with writing Terraform from scratch, but StackGen flips the process: it uses Backstage metadata as the source of truth and generates infrastructure definitions automatically.
For example, when you catalog a PaymentService with a Postgres database in Backstage, StackGen ingests this metadata and outputs a ready-to-deploy appStack containing:
- VPCs, subnets, and networking
- Compute instances or Kubernetes resources
- Managed database instances
- Security groups and IAM policies
All generated Terraform follows your organization’s patterns, tagging rules, and compliance constraints.
2. Cloud-Agnostic Mapping & Overrides
StackGen abstracts your Backstage components into logical resource types and lets you map them to specific resources per cloud provider.
For example:
These mappings are configurable inside the StackGen Mappings UI. If your naming, tagging, or resource choices change, you can update mappings without refactoring Terraform manually.
3. Latest Momentum
In 2025, StackGen accelerated after being acquired by OpsVerse, which added two big capabilities:
- A DevOps Copilot (“Aiden”), integrated into the StackGen Backstage plugin for chat-based infra modeling.
- Built-in observability for the generated stacks, allowing teams to monitor infra health without leaving Backstage.
Hands-on Example
Step 1: Prepare Backstage and private registry access
Start in a working Backstage app. You’ll add StackGen’s frontend and backend packages from a private registry scope, so wire your Yarn configuration first. In the repo root, update .yarnrc.yml so the stackgenhq scope resolves and authenticates against the vendor-hosted feed. Keep the token in your secret store, don’t commit it.
This scope enables you to yarn add the plugin packages the same way you would any internal/private module. If your security posture requires mirroring private packages into an internal registry, point npmRegistryServer at that mirror and keep ${REGISTRY_AUTH_TOKEN} limited to CI. The official StackGen plugin guide shows this exact setup and is a good reference if your environment has custom Yarn policies.
With the scope in place, install both halves of the plugin:
That brings a routable page into the Backstage UI and a backend module that talks to the StackGen adapter during “Sync.” The adapter handles auth, fetches mappings, and returns the appStack and Terraform artifacts.
Step 2: Configure the backend (secure API + plugin init)
Give your Backstage backend a way to reach the StackGen adapter. Add the following to your app-config.yaml (or app-config.local.yaml while testing), sourcing secrets from your vault or environment only, never from the repo. The keys and structure below match the StackGen docs.
Now register the backend plugin. If you’re on the new Backstage backend system, your entry point resembles this:
Boot the backend locally and watch the logs; you should see the module come up cleanly. If you’re still on the legacy backend pattern.
Step 3: Add the StackGen page and navigation
Create a route so platform and service teams have a clear entry point. In
Expose that route in your sidebar, e.g., Root.tsx:
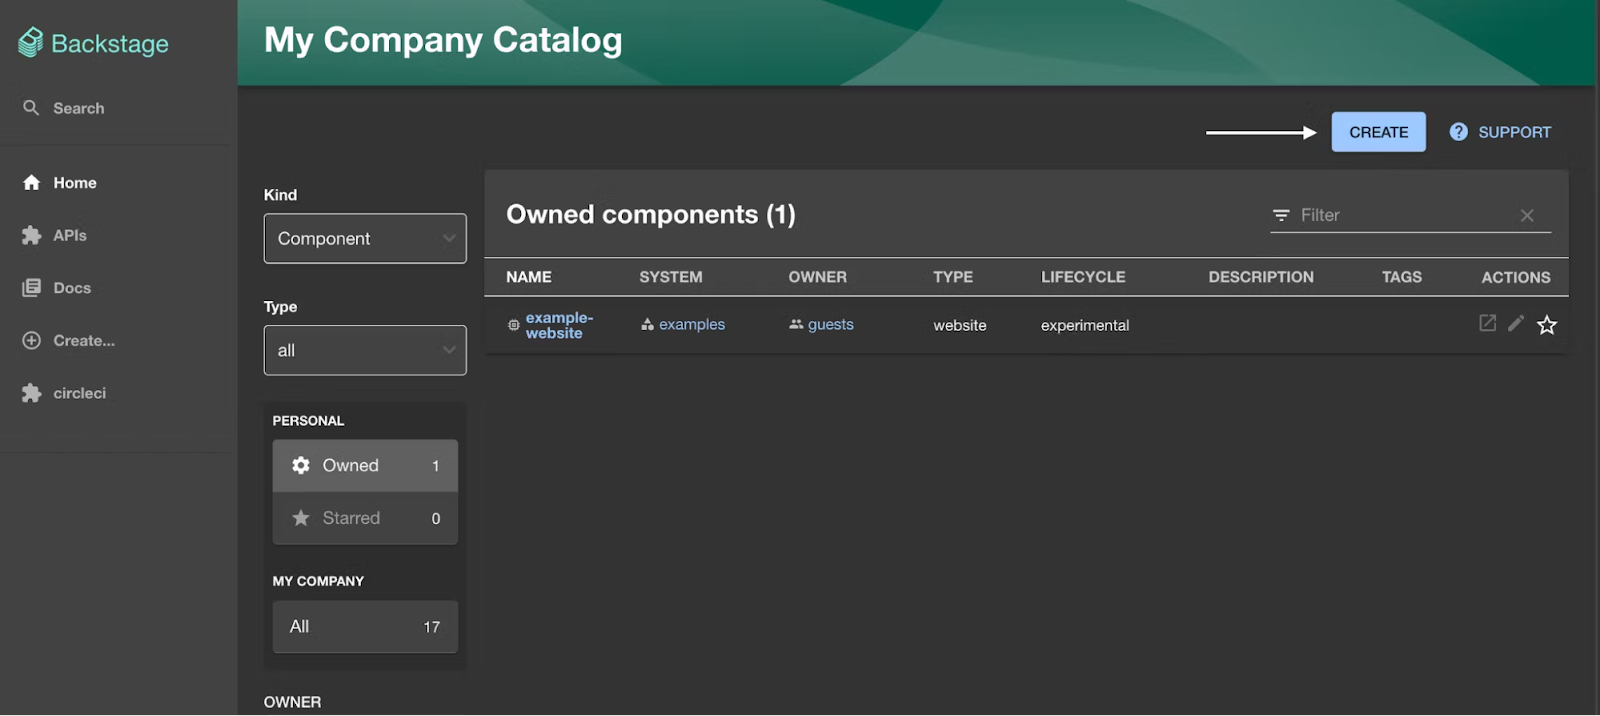
You now have a first-class “StackGen” link in your Backstage UI (see the first and fourth screenshots above for typical catalog and homepage views). This is where teams will click Sync to turn catalog intent into Terraform.
Step 4: Model a tiny system in the catalog
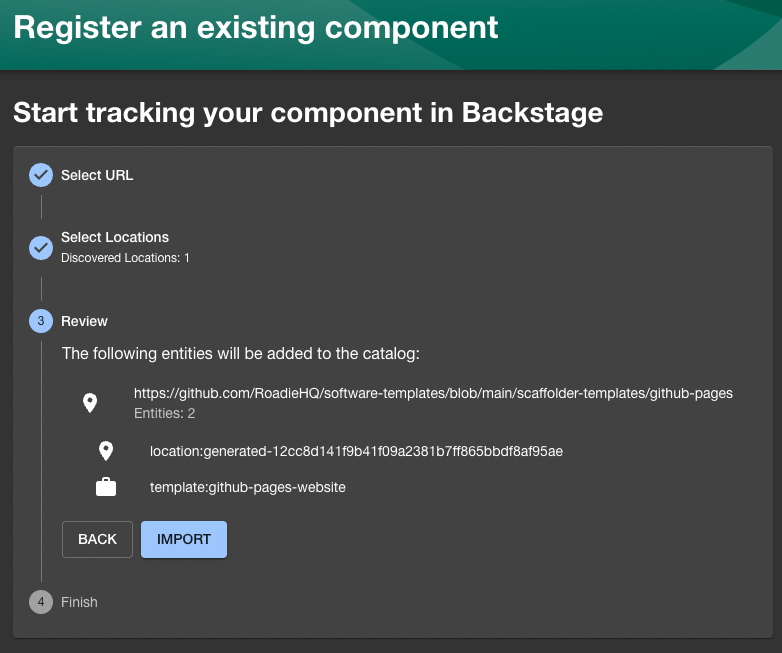
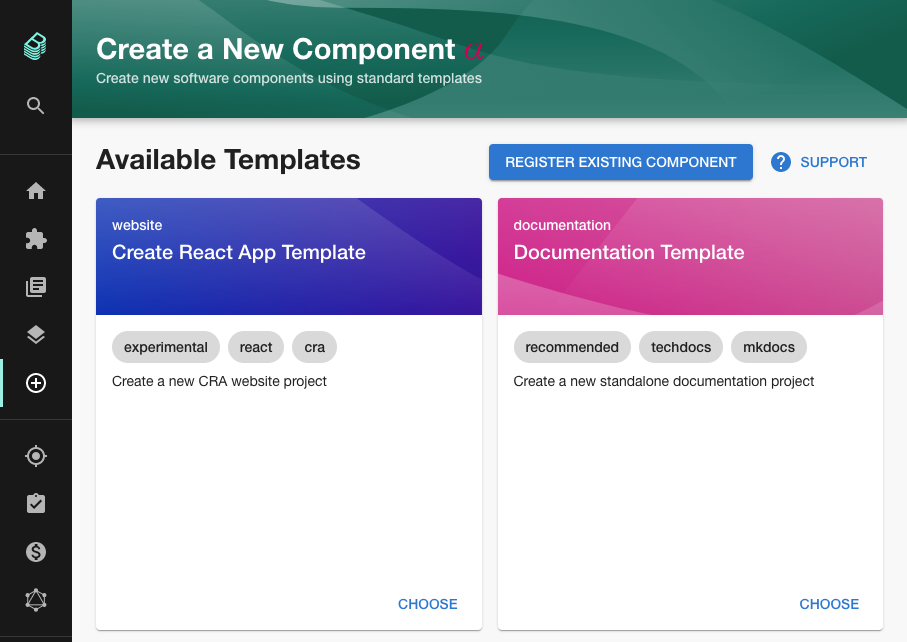
Before you click Sync, describe something real in the Software Catalog, say an orders system with an API component and a database resource. Backstage’s catalog entities and relations are the “source of intent” that StackGen will read. You can register components using the “Register existing component” flow or by pushing catalog-info.yaml to source control. The catalog entity model and relation types are documented by the Backstage team and Roadie ; copy their patterns and you’re set.
 Here’s a minimal pair you can drop into a repo and register:
Once registered, you’ll see the entities listed in the catalog. If you prefer templates, the Backstage Software Templates feature will also auto-register items as they’re created.
Step 5: Create Mappings (abstract types → cloud resources)
Open the StackGen page you added and go to Mappings → New. This is where you codify how abstract catalog types become concrete cloud resources. For example, map service to aws_ecs_service or google_cloud_run_service, and map database to aws_rds_instance or google_sql_database_instance.
Treat mappings like your organization’s cookbook. Bake in naming conventions, mandatory tags, encryption defaults, and network baselines so every generated stack is born compliant. As your standards evolve, you’ll update the mapping once and re-sync services; no need to refactor dozens of hand-written Terraform modules.
Step 6: Click Sync to generate an appStack from catalog intent
Navigate back to the Systems view within the StackGen page, select your orders system, and click Sync. StackGen will read the catalog relationships, apply your mapping, and produce an appStack, a topology for VPC, subnets, security groups, compute, and database, assembled from your policies. The Backstage-side flow (Systems → Sync → Create appStack) is described in StackGen’s Backstage user guide.
At this point, you’re not writing Terraform from scratch; you’re authoring intent. Think of Backstage as your mise en place and StackGen as the chef who plates a full meal from those labeled bowls. The advantage is consistency: every stack carries the same tags, encryption defaults, and IAM posture without developers having to memorize them.
When the appStack renders, skim the summary in the UI. You’ll see the components it inferred and the resources each will become under your chosen cloud provider. If you need to switch to another provider for a specific region, change the cloud and re-sync; the topology is regenerated against that provider’s resources using the same abstract model.
Step 7: Review and export Terraform, then hand off to CI/CD
From the same UI, export the generated Terraform bundle. A typical scaffold looks like this:
Commit it to your infra repo and let your pipeline run. A minimal GitHub Actions workflow is shown below as a reference; swap in Terraform Cloud, Spacelift, or env0 if that’s your standard. The point is that the input , not only the apply step, comes from a single source of truth: the catalog plus mappings.
Backstage’s catalog docs and demos reflect exactly where developers spend time: browsing entities and clicking into plugin pages. By exporting Terraform from StackGen rather than hand-authoring it, you’re shifting repetitive authoring into a repeatable generation step.

Step 8: What success looks like after a week
By the end of your first sprint, teams will register services in the catalog, click Sync on the StackGen page, and open PRs with standardized Terraform. Platform engineers review mappings and policies centrally rather than line-by-line in code. Your catalog remains the single UX for discovering, generating, and operating infrastructure, exactly the role Backstage was designed to play.
Pros
- Generates infrastructure, freeing developers from manual Terraform authoring.
- Governance and compliance embedded directly into the output for org-wide consistency.
- AI-powered agents reduce drift, incidents, and misconfigurations.
Cons
- Integration is request-based; you’ll need vendor provisioning before installing the plugin.
- Not a one-click OSS add-on from a public registry yet.
Pricing
StackGen operates as a vendor platform with enterprise licensing. Contact StackGen for pricing details.
2) Pulumi Backstage Plugin
Overview
Pulumi’s official Backstage plugin surfaces stack activity inside your portal and adds Scaffolder actions so teams can generate and update Pulumi projects directly from Backstage. You get an in-portal “Pulumi” view for entity activity, plus pulumi:new and pulumi:up actions usable in templates.
Key Features
Pulumi tab renders stack details/activity for catalog entities, and the Scaffolder actions let you create a new Pulumi project and trigger deployments from a template-driven flow, great for self-service infra that stays within Backstage.
Hands-On
Step 1: Install the UI plugin and Scaffolder backend module
Step 2: Wire the Scaffolder actions and set auth
Export a Pulumi access token for the backend (use your secret store in real setups):
The actions require a Pulumi token; the official README documents pulumi:new and pulumi:up inputs and Pulumi Deployments support.
Step 3: Add the Pulumi tab/card to your Entity page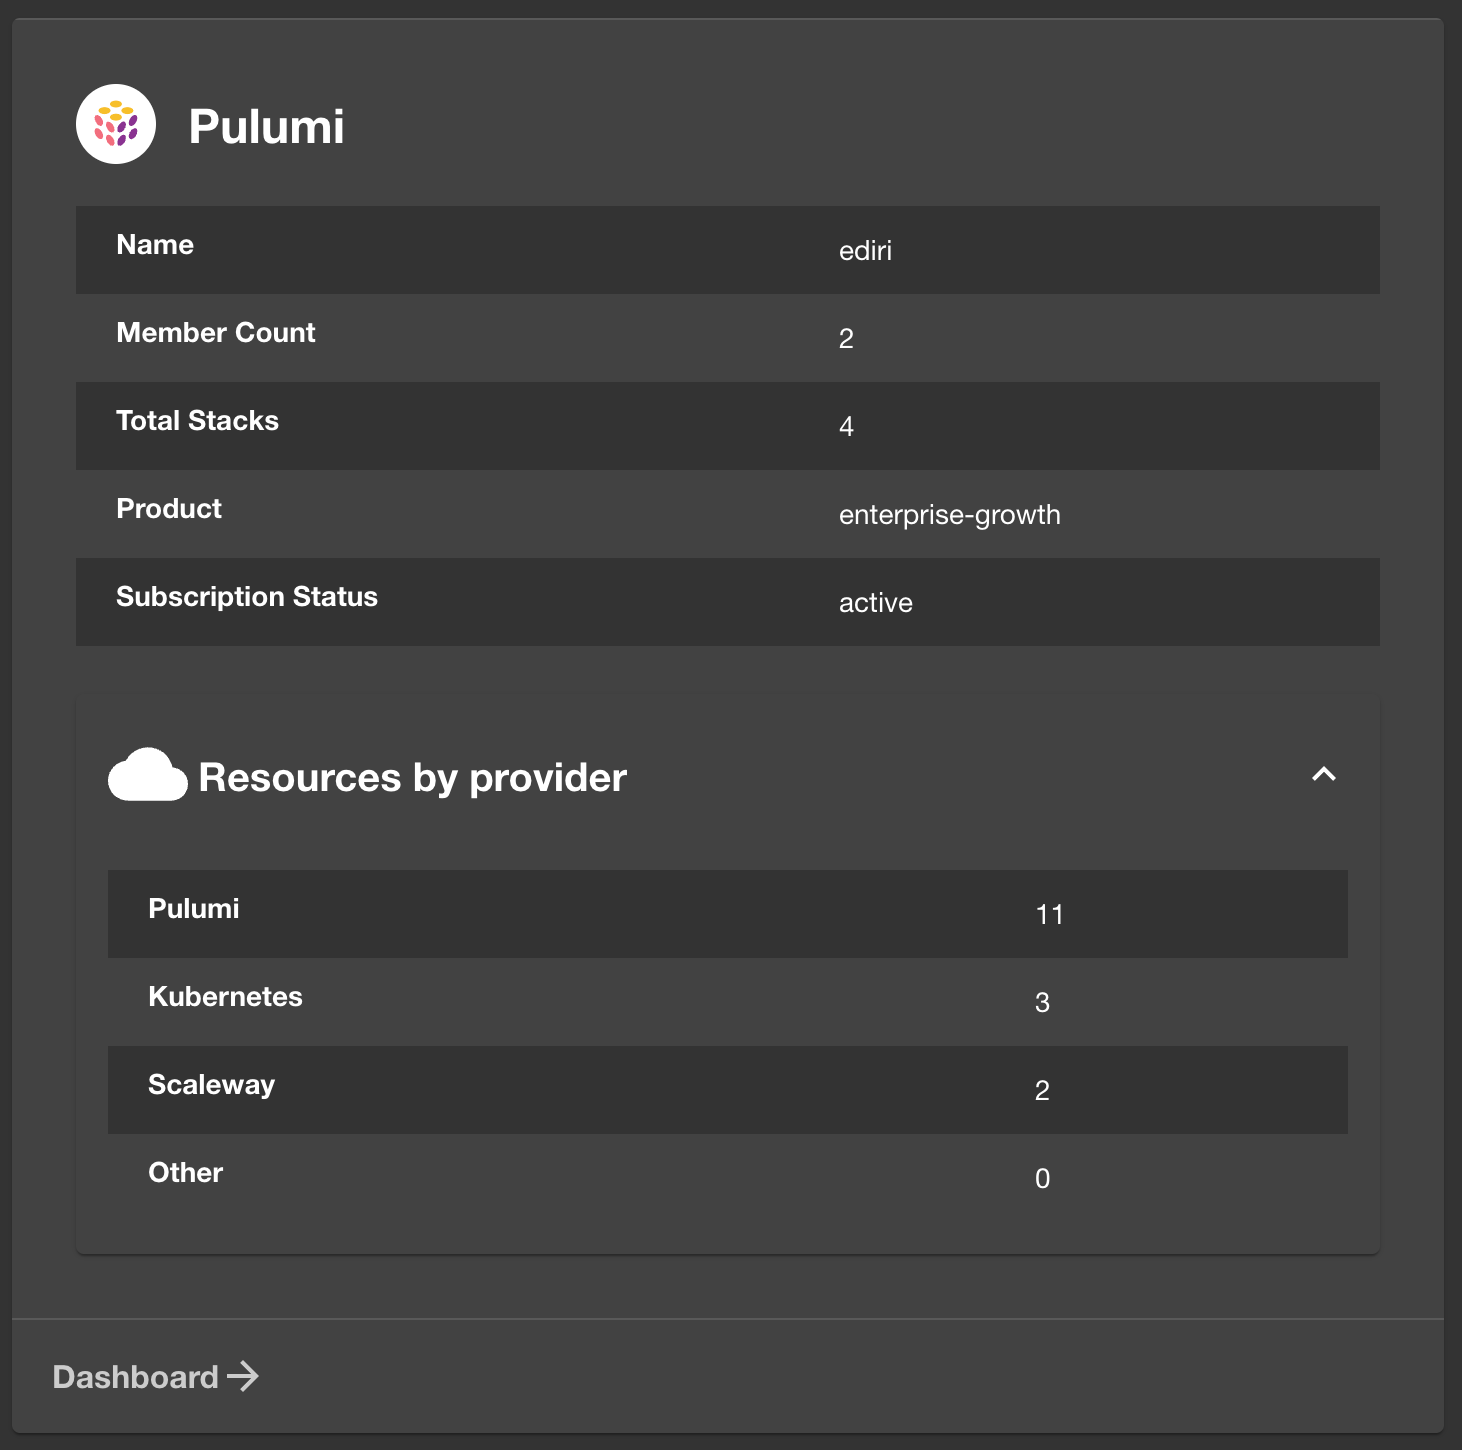
This renders a Pulumi tab and cards on your entity pages.
Step 4: Annotate/catalog or ingest stacks
Add Pulumi annotations so the plugin can resolve org/project/stack for an entity:
If you prefer ingestion, you can configure the Pulumi catalog provider to pull stacks into Backstage on a schedule.
Step 5: Minimal Scaffolder template using pulumi:new + pulumi:up
This is the leanest working example: generate a project, then update the stack. Inputs/variants are listed in the plugin README.
Step 6: Run it from Create and inspect result
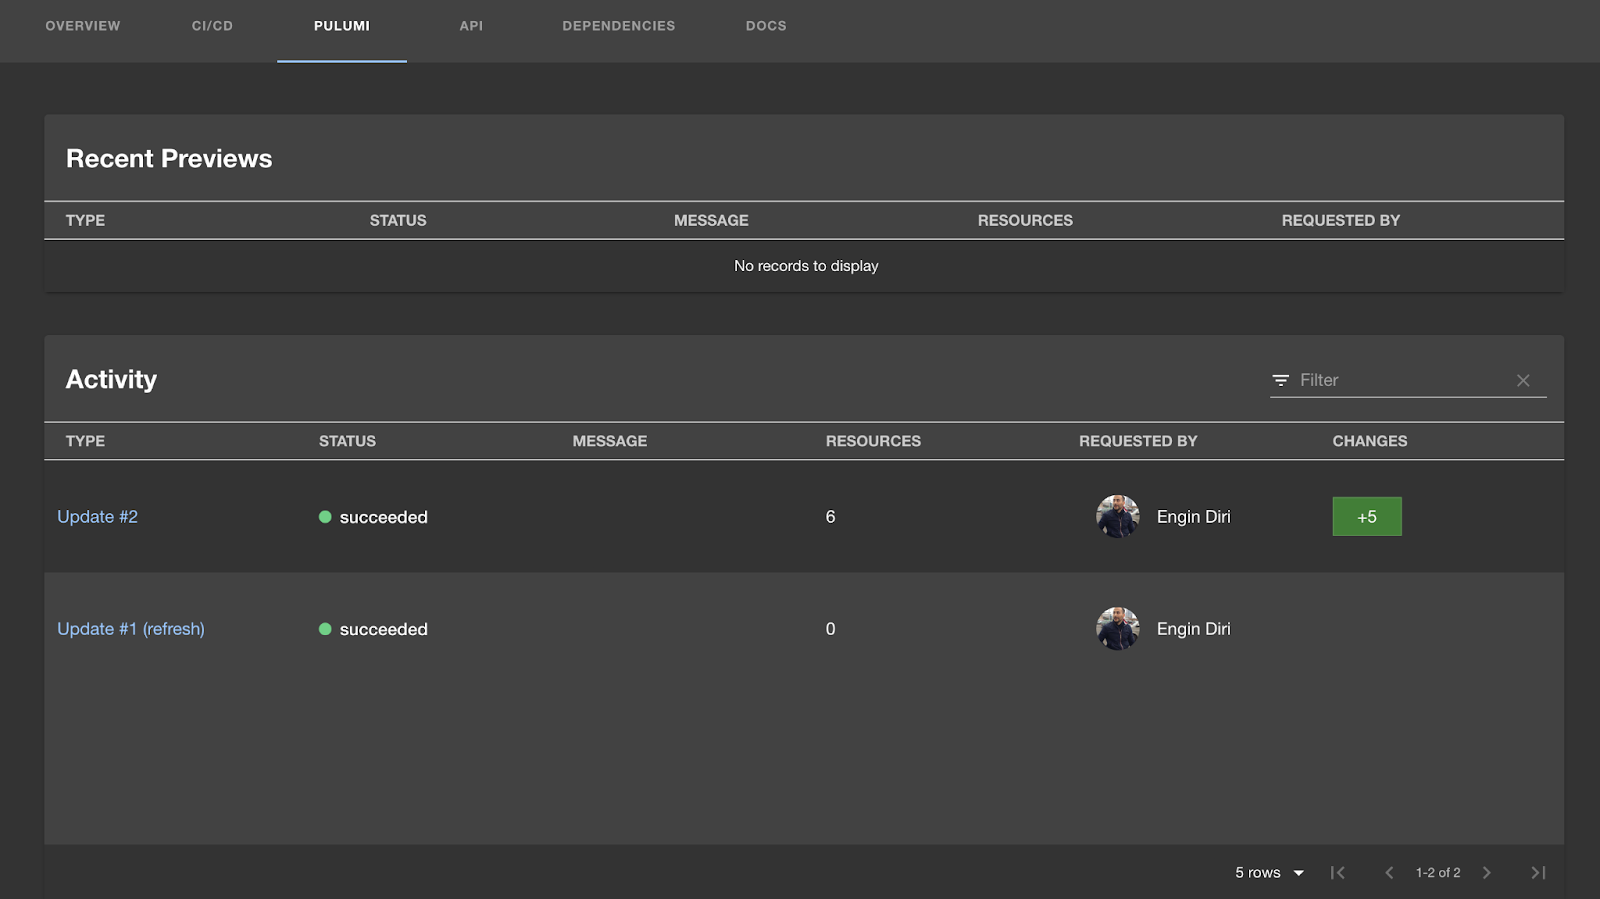
In Backstage, open Create, choose your Pulumi Project + Up template, supply parameters, and execute. After the run, open the entity and switch to the Pulumi tab to view stack details and recent activity. That tab pulls from Pulumi Cloud and shows updates for the entity’s stack(s).
Pros
Excellent Scaffolder integration; straightforward developer UX anchored in Backstage’s Create flow.
Cons
Purpose-built for Pulumi; not an orchestration layer for mixed Terraform/OpenTofu stacks.
Pricing
Plugin is open source; advanced features live behind Pulumi Cloud tiers if you adopt managed deployments/enterprise capabilities.
3) Spacelift Backstage Integration
Overview
Spacelift’s Backstage integration lets you list stacks and trigger runs from inside your portal, great when you already manage Terraform/OpenTofu/Pulumi with Spacelift and want in-portal orchestration. The official docs cover capabilities (stack list, rerun) and the exact install/config sequence we use below.
Key Features
Stack list and status directly in Backstage, plus the ability to trigger or re-run eligible stacks without leaving your portal.
Step 0: Create a Spacelift Integration Key (one time)
In Spacelift, go to Integrations → Backstage → Set up integration, choose the Space scope, and create the key. This generates API Key and API Secret (short-lived tokens issued from this admin integration key). Keep them in your secret store; we’ll wire them to Backstage next.
Step 1: Install the Frontend & Backend plugins
From your Backstage repo root (monorepo layout assumed):
These are Spacelift’s official packages for Backstage; they’re compatible with Backstage ≥1.17 (check their READ ME for older versions).
Step 2: Configure app-config.yaml with host & credentials
Provide your Spacelift instance URL and the key pair from Step 0:
Use a proper secrets mechanism for production; app-config.local.yaml is fine for local dev.
Step 3: Wire the plugin into your app (frontend + backend)
Register the backend plugin in your Backstage backend (new backend system example):
Add a route/page on the frontend so users can open Spacelift inside Backstage, e.g. expose a “Spacelift” page in your app routes and sidebar (exported component name per the frontend README). Once registered, you’ll see a Stacks view sourced from your Spacelift Space.
 (Shows the standard Backstage “register” UI, useful context if your team registers components alongside enabling the Spacelift page.)
Step 4: View stacks and statuses in Backstage
Open the Spacelift page you wired up. You should see a stacks list with current status for each stack that the integration key’s Space can access. If nothing appears, verify the Space scope on the Integration Key and that your config vars are set.
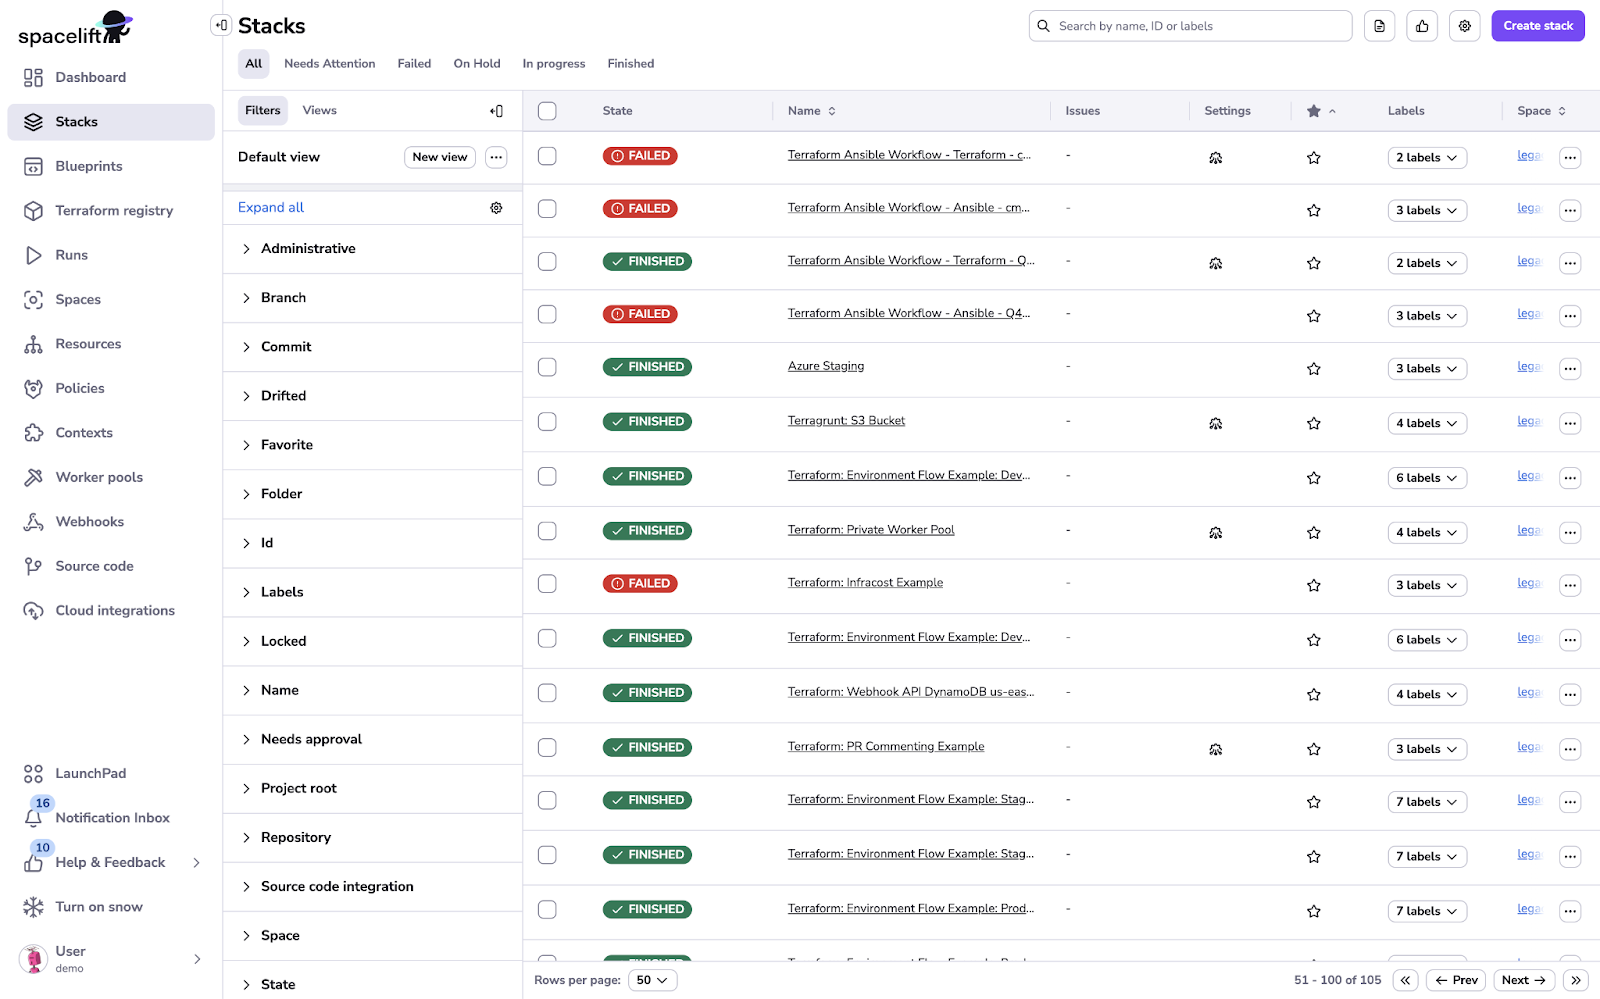
(This shows a representative Spacelift stacks list; in Backstage you’ll see a similar stacks table exposed via the plugin.)
Step 5: Trigger or re-run IaC jobs from Backstage
From that list, choose a stack that allows re-runs and click the Re-run/Trigger control. The plugin calls Spacelift to start a run; you can then hop to the detailed run view in Spacelift if needed. This closes the loop for day-to-day orchestration without leaving the portal.
(This shows the Spacelift dashboard tiles you’ll recognize when drilling into runs/health from Backstage.)
Step 6: Secure the surface (recommended)
The plugin uses the Integration Key permissions; configure Backstage routing/permissions so only the right personas can view/trigger runs. Spacelift’s docs explicitly call out the security model and best practices for limiting Space scope.
Pros
Designed for IaC orchestration at scale with a clean stacks list and in-portal run triggers; integrates neatly when your infra standard is Terraform/OpenTofu/Pulumi via Spacelift.
Cons
Operates existing stacks; does not generate IaC from metadata. Pair it with a generator (e.g., templates or another plugin) if you need source-of-truth → stack synthesis.
Pricing
Commercial Spacelift subscription tiers; the Backstage integration itself follows the product’s licensing.
4) env0 Backstage Plugin
Overview
The env0 Backstage plugin brings self-service Infrastructure as Code (IaC) with governance directly into your Backstage portal. Administrators can expose approved env0 templates, and developers can launch environments through Backstage’s Create flow and monitor or redeploy them from entity pages. Control and auditing remain within env0 while simplifying the user experience within Backstage.
Key Features
The plugin allows you to expose curated env0 templates in Backstage’s Create flow and deploy, monitor, and redeploy environments directly from the entity view. This bridges the gap between self-service IaC and centralized governance.
Hands-On Setup (Step-by-Step)
Step 1 : Install the UI Plugin and Scaffolder Backend Module
Step 2: Configure Backstage to talk to env0 (proxy + token)
Add a proxy entry and env0 access token to app-config.yaml so the plugin can call the env0 API:
Use a secrets store for ENV0_ACCESS_TOKEN.
Step 3: Add env0 to your Entity page (tab + overview card)
This surfaces deployment history, status, and redeploy controls on the entity. (You’ll typically reach this after creating or registering entities, see Image 4 for a representative Catalog view.)
 Step 4: Register env0 field extensions in the Create page
These custom fields let your template list env0 templates/projects and collect variables dynamically:
- Template Selector queries env0 for allowed templates using the API key.
- Project Selector lists projects (optionally filtered by the selected template).
- Variables Input renders env0 variables for the chosen template/project.
(This is exactly what users will interact with in Backstage’s Create flow)
Step 5: Minimal Scaffolder Template to spin up an env0 environment
This template asks for a template + project, gathers variables, and then calls the env0 create action:
Action env0:environment:create takes name, projectId, templateId, and optional variables; env0:environment:redeploy is also available for follow-up runs.
Step 6: Run from Create and monitor from the entity
Open Create → pick Deploy env0 Environment → select a Template and Project, add Variables, run. The workflow creates the environment in env0 and returns a link. Head to your entity’s env0 tab to see status, deployment history, and redeploy actions inline.
Pros
Fast path to Terraform/OpenTofu/Pulumi self-service with guardrails; templates remain curated by platform admins, developers operate from Backstage.
Cons
You’re working inside env0 workflows; it doesn’t generate IaC from Backstage metadata, pair it with templates or another generator if you need that upstream.
Pricing
Commercial env0 subscription tiers; Backstage integration follows the platform’s licensing.
5) Firefly Backstage Plugin , Hands-On Guide
Overview
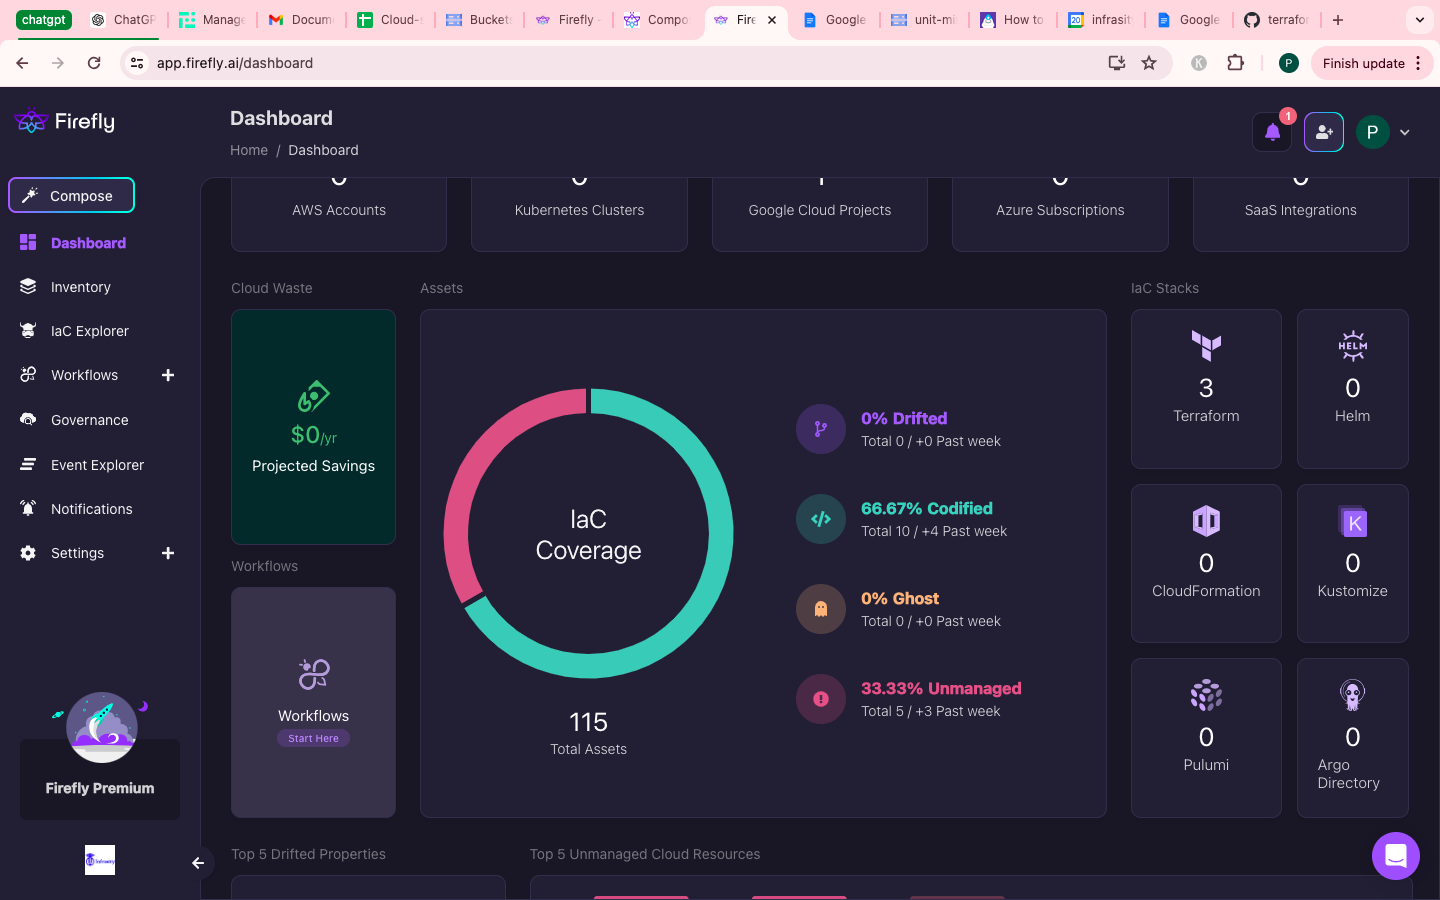
The Firefly Backstage plugin integrates cloud asset inventory and IaC (Infrastructure as Code) coverage/drift visibility directly into your Backstage portal. It includes a frontend that provides an entity-level IaC coverage card and a dedicated Firefly page, and a backend that imports Firefly assets, establishes relationships, and allows seamless browsing of cloud resources within Backstage systems. This integration helps platform teams quickly identify unmanaged resources and gradually bring them under IaC management.
Key Features
Inside Backstage, the plugin displays resource inventory aligned with catalog entities and provides a coverage/drift snapshot showing what is managed under Terraform and where drift exists. It enables seamless browsing between Backstage systems and associated cloud resources and allows platform engineers to prioritize unmanaged resources and bring them under Terraform over time.
Hands-On Setup (Step-by-Step)
Step 1: Install the Frontend and Backend Plugins
Step 2: Provide credentials & basic config
Export a Firefly access/secret pair for local dev (use your secret store in real deployments), then add minimal config:
The docs show these exact env vars and note where to place them.
Step 3: Register the backend plugin
Step 4: Add the Firefly page and entity card
In packages/app/src/App.tsx, add the Firefly page route:
In packages/app/src/components/catalog/EntityPage.tsx, add the IaC coverage card:
Optionally, add a sidebar link:
Step 5: Import assets & verify entity relationships
With the backend plugin enabled, Firefly can import cloud accounts as systems and assets as resource entities, stitching relations so you can click from a Backstage system to its cloud resources. Head to the Firefly page in Backstage and confirm that resources populate and the coverage card renders under your target entity. (Image shows the catalog list view you’ll traverse.)
Step 6: Use drift/coverage to move strays under IaC (see Image 4)
Developers can open an entity, glance at coverage/drift, and pick off unmanaged resources to codify in Terraform. Over time, the coverage ring should fill as more assets are represented in code. (Image evokes the code-to-cloud loop you’re closing; Firefly academy content and blog posts walk through inventory, coverage, and drift concepts.)
Pros
- Surfaces resource inventory + IaC coverage directly on Backstage entities.
- Helpful drift visibility to prioritize bringing unmanaged resources under Terraform.
- Backend provider can import assets and accounts to build a navigable cloud graph inside the catalog.
Cons
- Primarily visibility-oriented; does not generate IaC from Backstage metadata.
- Requires Firefly subscription/tenant and credentials management.
Pricing
Available via Firefly subscription tiers; the Backstage plugin follows the platform’s licensing.
Which Plugin Fits You Best? (2025 Snapshot)
Limitations Across the Ecosystem
Most Backstage plugins operate IaC (list stacks, run jobs, show status) but don’t generate it from service intent, so teams still hand-craft or maintain templates. To cover the whole lifecycle, you usually combine tools, generation (or templates), orchestration (Spacelift/env0/Pulumi), and visibility/drift (Firefly), which adds seams for auth, RBAC, and policy. Even with automation, drift and guardrails need ongoing tuning, and multi-cloud parity still demands curated modules and policies.
Why StackGen Stands Out
StackGen starts from Backstage metadata and synthesizes compliant Terraform automatically, baking in naming, tagging, and security at generation time. Its mappings keep one domain vocabulary while targeting AWS/Azure/GCP, and its agent suite adds governance, drift alignment, incident assist, and optimization around the same pipeline. Paired with your preferred orchestrator and visibility layers, it turns the IDP into a portal that produces standardized infrastructure, not just a place to run it.
Conclusion
Backstage has shifted from being a simple service catalog to a central interface where infrastructure creation, orchestration, and governance converge. Plugins drive this evolution by embedding IaC workflows, compliance policies, and now AI-driven automation directly into the portal. Choosing the right plugin means more than checking a feature list; it defines how efficiently your teams move from service definition to production-ready infrastructure.StackGen, Pulumi, Spacelift, and env0 represent different points along this spectrum. Some excel at orchestration, others at generation, and some aim to unify both while layering intelligence on top. The future points toward self-healing infrastructure portals where provisioning, drift remediation, and compliance are handled as part of a continuous lifecycle rather than isolated steps.As AI capabilities mature, the Backstage ecosystem will likely see even deeper integrations, plugins that not only generate infrastructure but also optimize and secure it in real time. Teams evaluating their options today should pick a plugin that not only meets current needs but also leaves room for these next-generation workflows.
FAQ
Q1. What’s the best free plugin to start with?
The official Backstage Terraform and Kubernetes plugins are good entry points for teams exploring basic IaC integration. They provide catalog awareness and scaffolding without heavy setup, making them ideal for early-stage adoption.
Q2. Which tool suits small platform teams best?
For smaller teams, Pulumi or env0 are often easier to start with because of their managed services and prebuilt Backstage actions. They reduce operational overhead while still supporting production-grade deployments.
Q3. Can I combine multiple plugins?
Yes. Many teams run Backstage with Terraform, Kubernetes, and an orchestration tool like Spacelift or env0 side by side. Combining plugins allows you to handle generation, deployment, and drift management under one portal while maintaining specialized workflows where necessary.
Q4. How is StackGen different from Pulumi, Spacelift, or env0?
StackGen emphasizes end-to-end automation: generating blueprints from service metadata, mapping abstract infrastructure vocabularies to cloud providers, and embedding AI for drift remediation and compliance. Pulumi, Spacelift, and env0 excel at orchestration and state management but rely on prewritten modules rather than generating new ones from catalog metadata.
